
 Deutsch
Juniper automation with NetBox and Jinja2
Small teams managing big infrastructure gets more and more common. Automation is the keyword that enables this. In this blog we share how NetBox can be an important part in that mission.
Why is it necessary?
In early startup phase most switches and routers will be configured manually. This is okay, until you start to have double digit numbers of devices to manage. You can save a lot of time by automating setup (day one) and maintenance (day two) tasks. This can be done using finished products like Arista CloudVision or Juniper Apstra. They offer a wide set of features to support you and your infrastructure all while using less engineering capacity. They offer automated provisioning, monitoring and configuration management in a low-code UI. While this sounds good, they can be very pricey and might not be a match for every topology or do not support every device vendor. Combining the automated topologies and manual scripting and templating is actually a feature of Arista CloudVision, which shows that both manual and ready-made tooling can be combined.
While we at HCD Consulting gladly show you around the Juniper and Arista solutions, we also want to provide some tips on how to tackle these challenges in an open-source manner.
NetBox to the rescue
The OpenSource tool “NetBox” is a platform which allows the user to document all the networking infrastructure, including devices, topology information, cables, IPs, subnets, protocols, customers, and so on. This not only helps the engineering department, but also is a great thing to have for the next audit, as the information can be easily queried by the compliance managers. Basically, in NetBox you define the desired state of the network and then work on ensuring this is applied to the real world.
From the get-go, NetBox has no function to render and deploy device configuration; however, there is an API and templating engine available to easily create your device configuration automatically.
Golden Configuration
This is called #GoldenConfiguration – from a single source of truth, a configuration is created that can then be compared and applied to the real-world devices.
This automatic comparison is useful for many involved parties:
- the IT department will find errors and problems faster,
- the management team loves to see good documentation and enforced policies by an open, zero trust platform,
- the compliance managers will be happy to fetch data for audits without creating a ticket for receiving an active device list.
But how… ? Show me the goods!!!111!
NetBox ships with an integrated templating engine, meaning you can define and program generic templates, that will use the device-specific data residing in NetBox to generate a configuration for each device automatically.
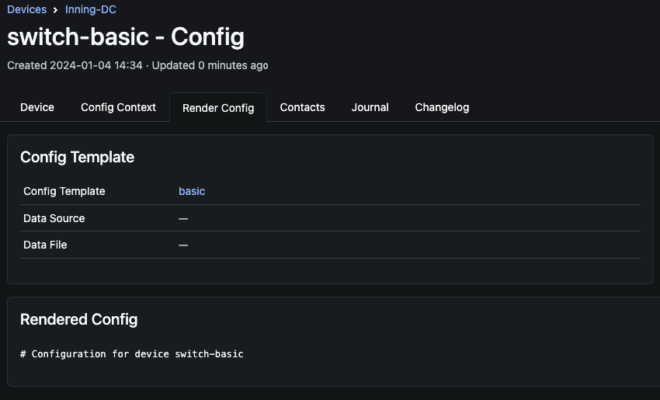
As NetBox is written in python, the Python-based templating engine jinja2 is used. To get started, create a configuration template and fill it with:
# Configuration for device {{ device.name }}
The {{ <varibale> }} syntax will evaluate the variable, in this case this will print the device name. To use it, assign the config template in device settings to the device.
The Juniper system configuration template can then look like this:
system { host-name {{ device.name }};}
Further steps …
For now, let’s create the interface configuration. Make sure the device has interfaces and IPs created and assigned to it for this to render anything.
In addition to rendering variables, there are also other control structures like if and for statements known from other programming languages. For the interfaces, we are going to loop through all available interfaces and create the unit 0 if the interface is enabled:
# System Interfaces Configuration for {{device.name}}
interfaces {
    {% for interface in device.interfaces.all() %}
    {{ interface.name }} {
        description "{{ interface.label }}";
        {% if interface.enabled %}
        unit 0 {

        }
        {% else %}
        disable;
        {% endif %}
    }
    {% endfor %}
}
Gets rendered to:
# System Interfaces Configuration for switch-01
interfaces {
    xe-0/0/0 {
        description "fizzbuzz";
        unit 0 {

        }
    }
    xe-0/0/1 {
        description "server-offline";
        disable;
    }
}
While it seems basic, those are all the tools required to render and create complicated device configuration with features like interfaces, VLANs, IPs, VRRP, LACP and more. There is an extensive example down below.
Summary
So much effort just for interface definition? We did it for you to get started! The first template might take a while, but it will get easier in no time. And the most important thing: You will never write interface configuration again, you will just use the NetBox REST Api or use the UI to assign a new IP address.
Complete example
In the following we show you how a full interface template could look like in Juniper config syntax. All physical, virtual and aggregated interfaces are created along with their IPs, VRRP groups and VLANs.
# System Interfaces Configuration for {{device.name}}
{% set vars = {'vrrp': False} %}

{% macro printIps(iface, ips) %}
{% set fhrps = iface.fhrp_group_assignments.all() %}
family inet {
    {% for ip in ips %}
    {% for fhrp in fhrps %}
        {% set vips = fhrp.group.ip_addresses.all() %}
        {% if vars.update({'vrrp': fhrp if vips and vips[0].network == ip.network else False}) %} {% endif %}
    {% endfor %}
    {% if vars.vrrp %}
    {% set vrrp = vars.vrrp %}
    address {{ ip }} {
        vrrp-group {{ vrrp.group.id }} {
            virtual-address {{ vrrp.group.ip_addresses.get().address.ip }};
            priority {{ vrrp.priority }};
        }
    }
    {% if vars.update({'vrrp': False}) %} {% endif %}
    {% else %}
    address {{ ip }};
    {% endif %}
    {% endfor %}
}
{% endmacro %}

interfaces {
    {% for iface in device.interfaces.all() %}
    {{ iface.name }} {
        description "{{ iface.label }}";
        {% if iface.enabled %}
        {% if iface.lag %}
        ether-options {
            802.3ad {{ iface.lag.name }};
        }
        {% else %}
        {% set ipv4 = iface.ip_addresses.filter(address__net_contained="0/0") %}
        {% set ipv6 = iface.ip_addresses.filter(address__net_contained="::/0") %}
        unit 0 {
        {% if ipv4 or ipv6 %}
            {% if ipv4 %}
            {{ printIps(iface, ipv4)|indent(12, False) }}
            {% endif %}
            {% if ipv6 %}
            {{ printIps(iface, ipv6)|indent(12, False) }}
            {% endif %}
        {% elif iface.untagged_vlan or iface.tagged_vlans.count() %}
            family ethernet_switching {
                {% if iface.untagged_vlan %}
                interface-mode access;
                members {{ iface.untagged_vlan.name }};
                {% else %}
                interface-mode trunk;
                members [ {{ iface.tagged_vlans.all() | map(attribute='name') | join(' ') }} ];
                {% endif %}
            }
        {% endif %}
        }
        {% endif %}
        {% else %}
        disable;
        {% endif %}
    }
    {% endfor %}
}
Gets rendered to:
# System Interfaces Configuration for switch-01
interfaces {
    xe-0/0/0 {
        description "management";
        unit 0 {
            family ethernet_switching {
                interface-mode access;
                members SERVER;
            }
        }
    }
    xe-0/0/1 {
        description "SERVER-eth0";
        ether-options {
            802.3ad ae0;
        }
    }
    xe-0/0/2 {
        description "SERVER-eth1";
        ether-options {
            802.3ad ae0;
        }
    }
    ae0 {
        description "SERVER-LAG-20G";
        unit 0 {
            family ethernet_switching {
                interface-mode trunk;
                members [ SERVER CUSTOMER ];
            }
        }
    }
    irb.10 {
        description "MANAGEMENT";
        unit 0 {
            family inet {
                address 192.168.0.1/24;
            }
        }
    }
    irb.20 {
        description "SERVER";
        unit 0 {
            family inet {
                address 10.0.0.245/24 {
                    vrrp-group 1 {
                        virtual-address 10.0.0.1;
                        priority 1;
                    }
                }
            }
        }
    }
    irb.30 {
        description "CUSTOMER";
        unit 0 {
        }
    }
}
Some notes for this example:
- You cannot change variables outside the loop, but you can change the contents of a dict, which is why we created the vars-dictionary.
- A NetBox FHRP group can have multiple virtual IPs, while Juniper only allows for one in VRRP, and therefore we select the first.
- To fix whitespace rendering, we suggest using these jinja2 settings:
{‘trim_blocks’: ‘true’, ‘lstrip_blocks’: ‘true’}